Illuminate Your Space: A Step-by-Step Guide to Replacing a Light Fixture
When it comes to refreshing your home’s ambiance, upgrading a light fixture can make a significant impact. In this comprehensive guide, we’ll walk you through the process of replacing a light fixture, allowing you to bring renewed brightness and style to your living spaces.
Assessing Your Lighting Needs: Choosing the Right Fixture
Before diving into the replacement process, take a moment to assess your lighting needs. Consider the function of the space and the ambiance you want to create. Whether you’re aiming for task lighting in the kitchen or ambient lighting in the living room, choosing the right fixture sets the tone for an effective upgrade.
Safety First: Turning Off the Power
Safety is paramount when dealing with electrical fixtures. Begin by turning off the power to the existing light fixture at the circuit breaker. Use a voltage tester to ensure that the power is indeed off before proceeding with the replacement. Taking these precautions minimizes the risk of electrical accidents during the installation.
Removing the Existing Fixture: Uninstalling the Old
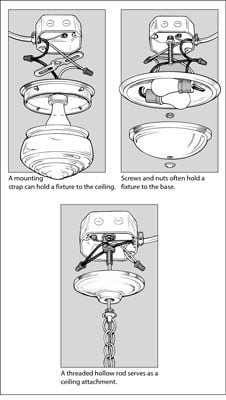
With the power off, remove the existing light fixture carefully. Typically, this involves loosening screws or nuts that secure the fixture to the mounting bracket. Gently lower the fixture and disconnect the wiring. Pay attention to how the wires are connected, as this information will be crucial when installing the new light fixture.
Inspecting and Updating Wiring: Ensuring Compatibility
While the existing fixture is removed, inspect the wiring for any signs of wear or damage. If you notice frayed or discolored wires, consider updating them. Ensure that the new light fixture is compatible with your home’s wiring, and make any necessary adjustments or upgrades to guarantee a safe and efficient installation.
Choosing a Mounting Bracket: Ensuring Stability
The mounting bracket plays a crucial role in supporting the new light fixture. Assess the existing bracket’s condition, and if necessary, replace it with one that is compatible with your chosen light fixture. A stable mounting bracket ensures that the new fixture is securely anchored to the ceiling.
Matching and Connecting Wires: Establishing the Right Connections
With the new fixture ready, match the wires according to color and connect them securely. Typically, this involves connecting the black wires together, the white wires together, and the ground wires. Follow the manufacturer’s instructions for your specific fixture, and use wire connectors to establish secure connections. Tuck the connected wires into the electrical box.
Attaching the New Fixture: Securing in Place
Once the wiring is connected, align the screw holes of the new light fixture with the mounting bracket and secure it in place. Use the provided screws to fasten the fixture to the bracket, ensuring it is stable and flush against the ceiling. Follow the manufacturer’s instructions for any additional steps specific to your light fixture model.
Installing Bulbs and Shades: Adding the Finishing Touches
With the fixture securely in place, install the appropriate light bulbs and shades. Ensure that the wattage of the bulbs aligns with the fixture’s recommendations. This step allows you to control the brightness and ambiance of the room. Consider energy-efficient LED bulbs for a long-lasting and eco-friendly lighting solution.
Testing the Fixture: Ensuring Proper Functionality
Before completing the installation, turn the power back on at the circuit breaker. Test the new light fixture to ensure proper functionality. If the fixture has multiple settings or dimming capabilities, check each one to ensure all features are working correctly. This step allows you to address any issues before finishing the installation.
Adding a Decorative Touch: Enhancing Aesthetics
With the new light fixture successfully installed and functional, take a moment to appreciate the decorative impact it adds to the space. A stylish light fixture can serve as a focal point, enhancing the overall aesthetics of the room. Choose a design that complements your decor and reflects your personal style.
Explore DesigningTemptation.com for Lighting Inspiration
For more lighting inspiration, tips, and expert advice on home improvement projects, including replacing light fixtures, visit DesigningTemptation.com. The website offers a variety of resources to help you illuminate your living spaces with style and functionality.
Conclusion: A Bright and Stylish Upgrade
Replacing a light fixture is a rewarding home improvement project that instantly transforms the ambiance of your space. With careful planning, attention to safety, and a stylish fixture choice, you can bring renewed brightness and a touch of elegance to any room in your home. Follow this step-by-step guide for a seamless upgrade that enhances both form and function.

