Introduction: Elevating Your Home with a New Door Frame
Installing a new door frame is a transformative home improvement project that enhances both functionality and aesthetics. In this comprehensive guide, we’ll take you through the step-by-step process of installing a new door frame, providing expert insights to ensure a seamless and successful endeavor.
Assessing the Space and Door Frame Dimensions
Measuring and Planning
Before diving into the installation process, begin by measuring the door opening and the dimensions of the new door frame. Accurate measurements are crucial for a precise fit. Consider the type of door you’ll be installing – whether it’s a standard hinged door, a sliding door, or a pocket door – and plan accordingly.
Selecting the Right Materials*
Choose materials for the new door frame that align with your style preferences and the overall aesthetic of your home. Common options include wood, metal, or composite materials. Consider factors such as durability, maintenance requirements, and how well the material complements your existing interior or exterior design.
Gathering Tools and Equipment
Essential Tools for the Job
Ensure you have the necessary tools for the installation process. This may include a saw, a level, a power drill, screws, a hammer, a chisel, and a measuring tape. Having the right tools on hand streamlines the installation and ensures precision in each step.
Ensuring Safety Precautions
Prioritize safety by wearing appropriate personal protective equipment (PPE) such as safety glasses and gloves. If using power tools, follow the manufacturer’s guidelines and take necessary precautions to prevent accidents or injuries during the installation.
Removing the Existing Door Frame
Careful Demolition
Begin by carefully removing the existing door frame. Use a pry bar and hammer to loosen and remove the trim around the door. Take caution to avoid damaging the surrounding wall during this process. Once the trim is removed, extract any nails or screws securing the old door frame to the wall.
Extracting the Old Frame*
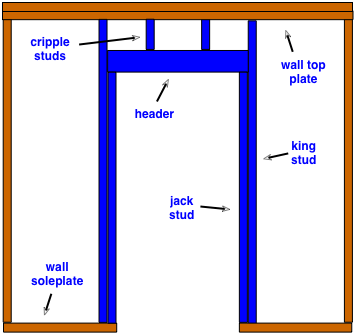
With the trim removed, carefully extract the old door frame from the door opening. Depending on the construction, this may involve unscrewing it from the wall studs or using a saw to cut through the frame. Take your time to avoid unnecessary damage to the surrounding walls.
Preparing the Door Opening
Cleaning and Smoothing Surfaces
With the old frame removed, thoroughly clean and smooth the surfaces surrounding the door opening. Remove any old paint, adhesive, or debris. A clean and smooth surface ensures proper adhesion and a seamless installation of the new door frame.
Checking the Door Opening for Squareness*
Use a level and a framing square to check the door opening for squareness. This step is crucial for ensuring that the new door frame fits perfectly and operates smoothly. If the opening is not square, adjustments may be necessary before proceeding with the installation.
Installing the New Door Frame
Fitting the New Frame into Place
Carefully position the new door frame in the opening, ensuring that it fits snugly and aligns with the square and level checks. Secure the frame in place using screws or nails. Take extra care to maintain the correct dimensions and alignment throughout the installation.
Attaching the Hinges and Preparing for the Door
If your door frame includes hinges, attach them according to the manufacturer’s instructions. Ensure proper alignment to guarantee that the door will open and close smoothly. If your door frame does not include pre-cut hinge recesses, use a chisel to create the necessary recesses.
Adding Finishing Touches
Installing Trim and Molding
Enhance the visual appeal of your new door frame by installing trim and molding. Choose styles that complement your interior design. Secure the trim with finishing nails, and use wood putty to fill any gaps or holes. Sand the surfaces for a smooth finish before applying paint or stain.
Applying Paint or Stain
Complete the installation by applying paint or stain to the new door frame. Choose a finish that complements the overall aesthetic of your space. Allow ample drying time between coats, and follow the manufacturer’s recommendations for the chosen paint or stain.
Final Checks and Adjustments
Testing the Door Operation
Before considering the installation complete, thoroughly test the door’s operation. Open and close it multiple times to ensure smooth movement. Check for any signs of misalignment or sticking and make necessary adjustments to hinges or latch plates.
Inspecting for Gaps or Drafts
Conduct a final inspection to ensure there are no gaps around the door frame that could compromise energy efficiency or security. Address any gaps by using weatherstripping or additional sealant to create a snug and insulated fit.
Conclusion: Enjoying the Fruits of Your Installation Efforts
Installing a new door frame is a rewarding project that significantly enhances the functionality and visual appeal of your home. By following these step-by-step guidelines and paying attention to details, you’ll enjoy a seamless and successful installation that elevates your living space.
To explore more about how to install a new door frame, visit our comprehensive guide for additional tips and insights. Your newly installed door frame is a gateway to enhanced aesthetics and functionality in your home.

