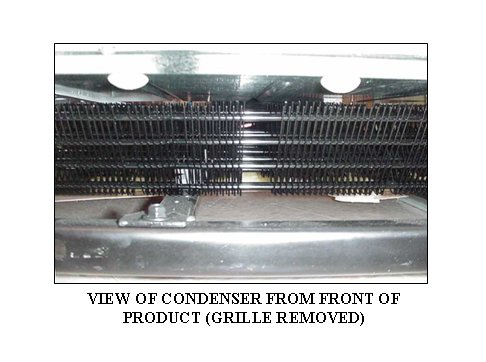
Refresh Your Fridge: Cleaning Refrigerator Coils for Efficiency

Refresh Your Fridge: A Guide to Cleaning Refrigerator Coils for Efficiency
Maintaining the efficiency of your refrigerator goes beyond organizing the contents or adjusting the temperature settings. One often overlooked yet crucial aspect is cleaning the refrigerator coils. In this comprehensive guide, we’ll walk you through the process of cleaning refrigerator coils, helping you ensure optimal performance and energy efficiency.
Understanding the Importance: Why Clean Refrigerator Coils Matter
Refrigerator coils, located either at the back or underneath the appliance, play a vital role in heat exchange, allowing the refrigerator to cool effectively. Over time, these coils can accumulate dust, dirt, and debris, hindering the heat exchange process. Cleaning refrigerator coils is essential for ensuring the appliance works efficiently, reducing energy consumption, and prolonging its lifespan.
Gathering Necessary Tools: Preparation for Cleaning
Before delving into the cleaning process, gather the necessary tools: a vacuum cleaner with a brush attachment, a coil
Revitalize Your Space: Expert Guide to Repairing Cracked Walls

Revitalize Your Space: Expert Guide to Repairing Cracked Walls
Cracked walls can be a common issue in homes, often resulting from various factors such as settling, humidity, or structural problems. In this comprehensive guide, we’ll walk you through the steps to repair cracked walls and revitalize your living space.
Understanding the Causes of Cracked Walls
Before diving into the repair process, it’s essential to understand the underlying causes of cracked walls. Structural issues, foundation settling, or even seasonal changes can contribute to wall cracks. Identifying the root cause will guide you in choosing the most effective repair approach.
Assessing the Severity of the Cracks
Not all wall cracks are created equal. Some may be superficial, while others can indicate more significant structural problems. Begin by assessing the severity of the cracks. Measure their width, length, and observe any patterns. This evaluation will help determine the appropriate repair methods.
Gathering the
Transform Your Space: Step-by-Step Guide to Installing a New Floor

Introduction: Redefining Your Living Space with a New Floor
Installing a new floor is a transformative home improvement project that can revitalize your living space. Whether you’re replacing worn-out flooring or seeking a fresh aesthetic, this step-by-step guide will walk you through the process, allowing you to achieve a stunning result.
Assessment and Planning: The Foundation for Success
Before diving into the installation, assess your space and plan accordingly. Consider factors such as the type of flooring material, the layout of the room, and any necessary preparations. Taking the time to plan ensures a smooth installation process and a finished product that aligns with your vision.
Choosing the Right Flooring Material: Aesthetic and Practical Considerations
The success of your flooring project hinges on choosing the right material. Options range from hardwood and laminate to tile and vinyl. Consider both aesthetic preferences and practicality. Factors such as durability, maintenance, and the
Upgrade Your View: Simple Steps to Replace a Window Screen

Upgrade Your View: Simple Steps to Replace a Window Screen
Replacing a window screen may seem like a daunting task, but with a few simple steps, you can enhance both the functionality and aesthetics of your windows. Follow this guide for a hassle-free window screen replacement.
**1. Assessing the Damage:
Before diving into the replacement process, assess the condition of your existing window screen. Identify any tears, holes, or signs of wear and determine whether a complete replacement is necessary. This initial evaluation will guide your next steps.
2. Gather Necessary Tools:
Ensure you have the necessary tools on hand before starting the replacement. You’ll typically need a flathead screwdriver, a utility knife, replacement screen material, a spline roller, and a frame kit. Having everything ready will streamline the process.
3. Removing the Old Screen:
Use the flathead screwdriver to carefully pry the old spline (the rubber gasket that holds
Cleaning a Range Hood: Tips for a Grease-Free Kitchen

Cleaning a Range Hood: Tips for a Grease-Free Kitchen
Introduction
Maintaining a clean and functional kitchen involves more than just wiping down countertops and washing dishes. Often overlooked, the range hood plays a crucial role in keeping your kitchen free from grease and cooking odors. Regular cleaning not only ensures optimal performance but also contributes to a healthier cooking environment.
The Importance of a Clean Range Hood
A range hood serves as a ventilation system, extracting grease, smoke, and odors produced during cooking. Over time, these particles accumulate, affecting the hood’s efficiency and potentially posing a fire hazard. Regular cleaning is essential to prevent the buildup of grease and maintain a safe and pleasant kitchen space.
Preparation for Cleaning
Before diving into the cleaning process, gather the necessary supplies. You’ll need a degreaser, warm water, a sponge or cloth, a scrub brush, and a vacuum cleaner with a brush attachment.
