Explore Interior Decorating Websites for Home Inspiration
Subheading: Unleash Your Creativity
In today’s digital age, exploring interior decorating websites has become the go-to method for finding inspiration and ideas to transform your home. These online platforms offer a wealth of resources, from stunning visual galleries to expert advice articles, allowing you to unleash your creativity and envision the home of your dreams.
Tag: Home Decor, Inspiration, Interior Design
Subheading: Discover Design Trends
One of the key benefits of exploring interior decorating websites is the opportunity to discover the latest design trends. Whether you’re drawn to minimalist Scandinavian interiors or cozy farmhouse chic, these websites showcase a diverse range of styles and aesthetics, helping you stay informed about what’s hot in the world of interior design.
Tag: Design Trends, Style Inspiration, Home Trends
Subheading: Get Expert Advice
Navigating the world of interior design can be overwhelming, but interior decorating websites are here to help. Many of these platforms
How to Clean and Maintain Your Range Hood for Optimal Performance

Maintaining Your Range Hood for Optimal Performance
Introduction: The Importance of Range Hood Maintenance
Range hoods play a crucial role in keeping our kitchens clean and free from excess smoke, grease, and odors. To ensure their optimal performance, regular maintenance is essential.
Why Regular Cleaning Matters
Proper maintenance of your range hood is not just about aesthetics; it’s about functionality too. Over time, grease and debris can accumulate, hindering the hood’s efficiency. A clean range hood not only enhances the air quality in your kitchen but also prevents potential fire hazards.
Step-by-Step Cleaning Guide
1. Gather Your Supplies
Before you start cleaning, make sure you have all the necessary supplies. This typically includes a degreaser or a mixture of warm water and mild dish soap, a soft cloth or sponge, and a bucket.
2. Power Off and Disconnect
For safety reasons, it’s crucial to turn off the power to the
Maintaining Your Sump Pump: Essential Tips for Efficiency

Maintaining Your Sump Pump: Essential Tips for Efficiency
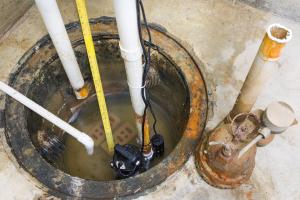
When it comes to safeguarding your home against flooding, a reliable sump pump is your first line of defense. Regular maintenance is key to ensuring its optimal performance. Follow these essential tips to keep your sump pump in top shape and your basement dry.
1. Regular Inspections:
Routine inspections are crucial in identifying potential issues before they escalate. Check for any visible signs of wear and tear, and ensure the pump is sitting upright. Make sure the float switch moves freely and doesn’t get stuck.
2. Testing the Float Switch:
The float switch is a critical component that triggers the sump pump when water levels rise. Periodically test the switch by pouring water into the pit. The pump should activate and drain the water. If not, consider replacing the float switch to avoid malfunctions during heavy rainfall.
3. Cleaning the Pump and

